This guide is based on various community forum posts and webpages. Special thanks to all. All comments and improvements are very welcome as this is purely a personal experimental project at this point and must be considered a work in progress.
This guide is intended as a relatively easy step by step guide to:
Install and configure an Ubuntu 12.04 LTS server for use by small and medium enterprises as business server providing the following features:
|
Ubuntu Business Box Server Features |
Software |
|---|---|
|
Server operating system |
Ubuntu 12.04 LTS |
|
Network Firewall |
ufw * |
|
DNS server |
Dnsmasq |
|
DHCP server |
ISC DHCP |
|
Internet sharing with proxy and cache control, including reporting and user access control |
Squid | Sarg |
|
Anti-Virus and Anti-Spam |
ClamAV | AMaViS | SpamAssassin |
|
Groupware Email, Contacts, Calendar, Webmail, with native Microsoft Outlook compatibility and mobile device support |
SOGo * |
|
Instant Messaging, VOIP and Video Chat server |
Openfire | Spark * |
|
Shared Printers and Files |
Samba |
|
Webserver |
Apache * |
|
FTP server |
ProFTP * |
|
Database server |
MySQL * |
|
VPN |
LogMeIn Hamachi | Haguichi * |
|
Virtualization support |
Oracle VM VirtualBox * |
|
Network Backup |
RAID1 NAS * |
|
Cloud Backup |
Ubuntu One * |
|
Remote Desktop Administration |
x11vnc * |
|
Remote Web Administration |
Webmin |
|
System Monitoring |
|
|
Automatic Security Updates |
* See - How to setup an Ubuntu Business Box Server - UBB Part 2
Requirements:
- 32bit or 64bit Computer to use as server
- 2GB RAM minimum. 8GB or more is ideal.
- 2 x LAN network adaptors
- 1 x Boot Hard Drive of at least 20GB
- 2 x 1TB (or any same size) hard drives to act as RAID 1 backup storage on server (optional)
- 1 x Internet Router ADSL or Cable
- 1 x Network Router or switch for client computers
- The Fan Club Recommends : HP ProLiant Microserver
Support:
- Free support is available on the various project websites and forums.
- We offer commercial support for those who do not want to do all the installation work from scratch:
- Bootable 16GB USB Disk with customised installation GUI configuration wizard. P.O.A
- *HP ProLiant Microserver with customised installation GUI configuration wizard. P.O.A (* for South African Residents only)
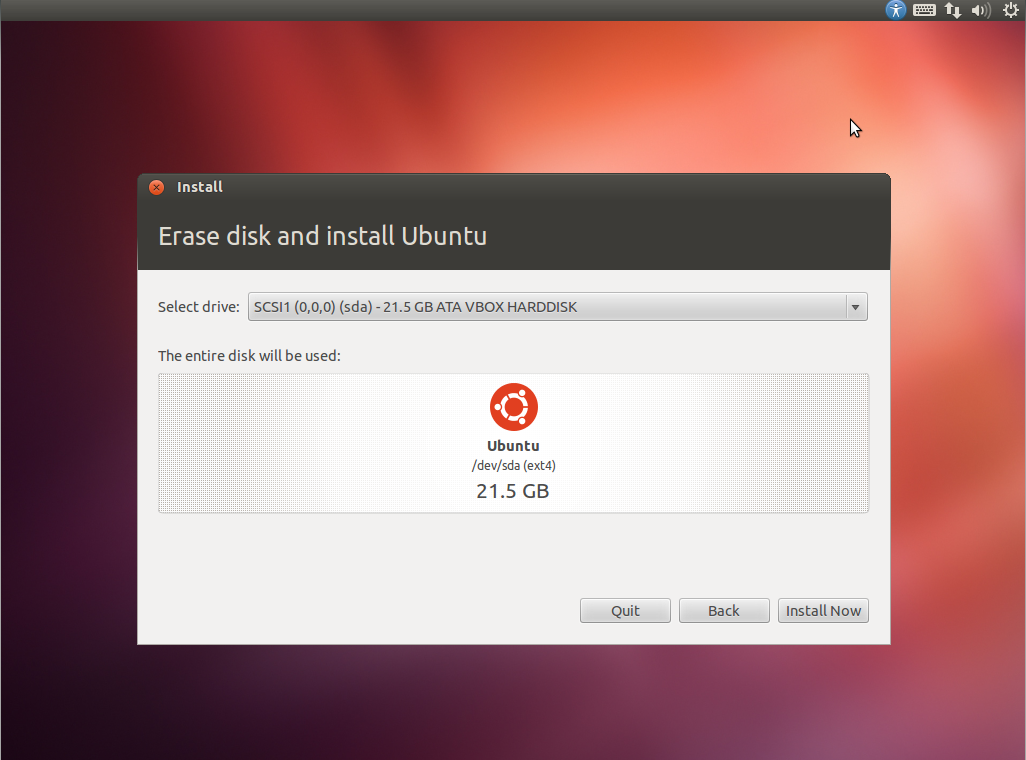
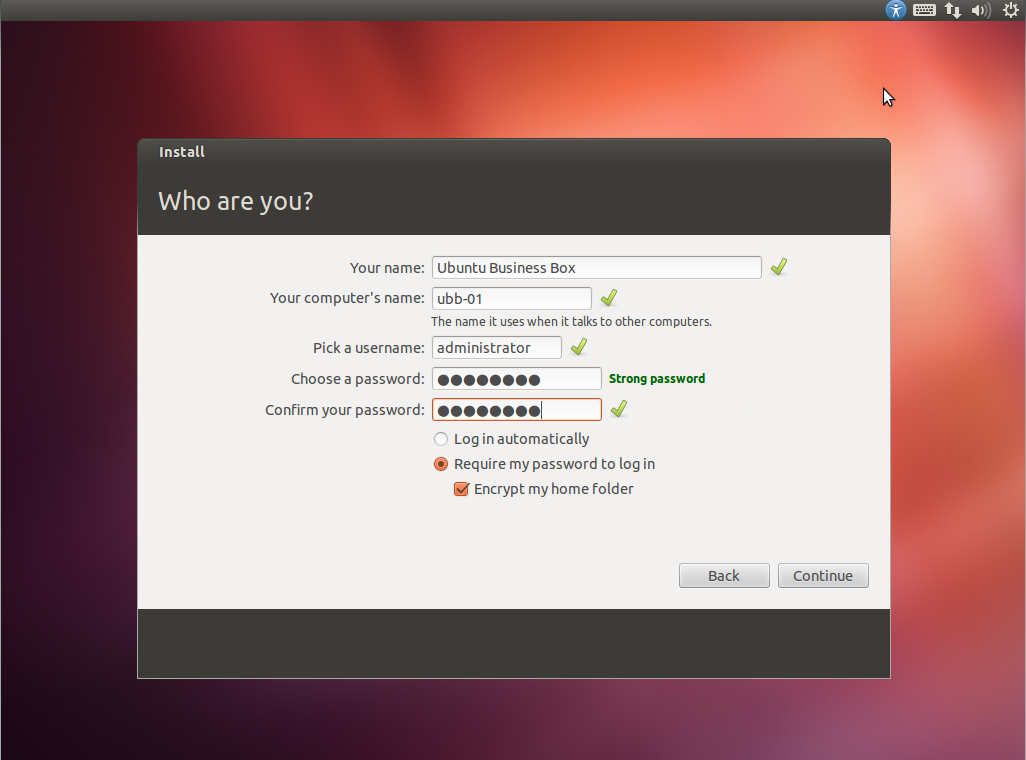
1. Install operating system - Ubuntu 12.04 LTS
- Download Ubuntu 12.04 LTS 32bit or 64bit, Server or Desktop edition. This guide is based on the desktop installation for users not comfortable with command line only.
- Create a bootable USB stick or CD and boot your server computer with the installation as explained on Ubuntu site.
- Once you have booted your computer from the Ubuntu installation USB stick or CD you should see the installation screens below.
- Follow the instructions and adapt as required.
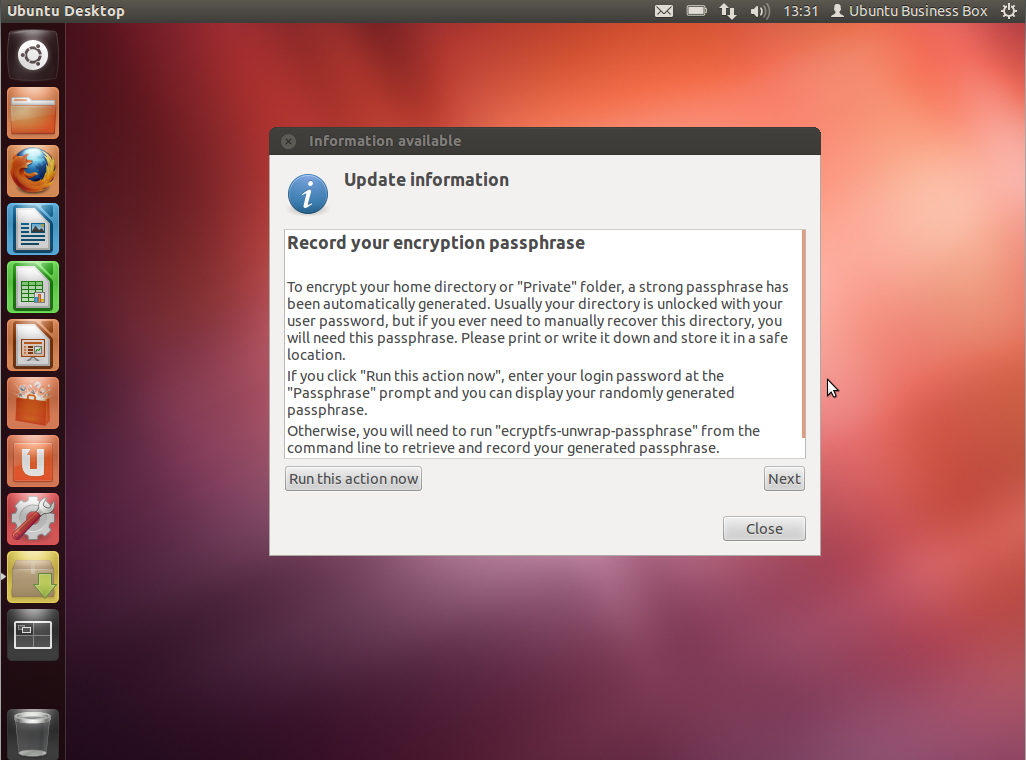
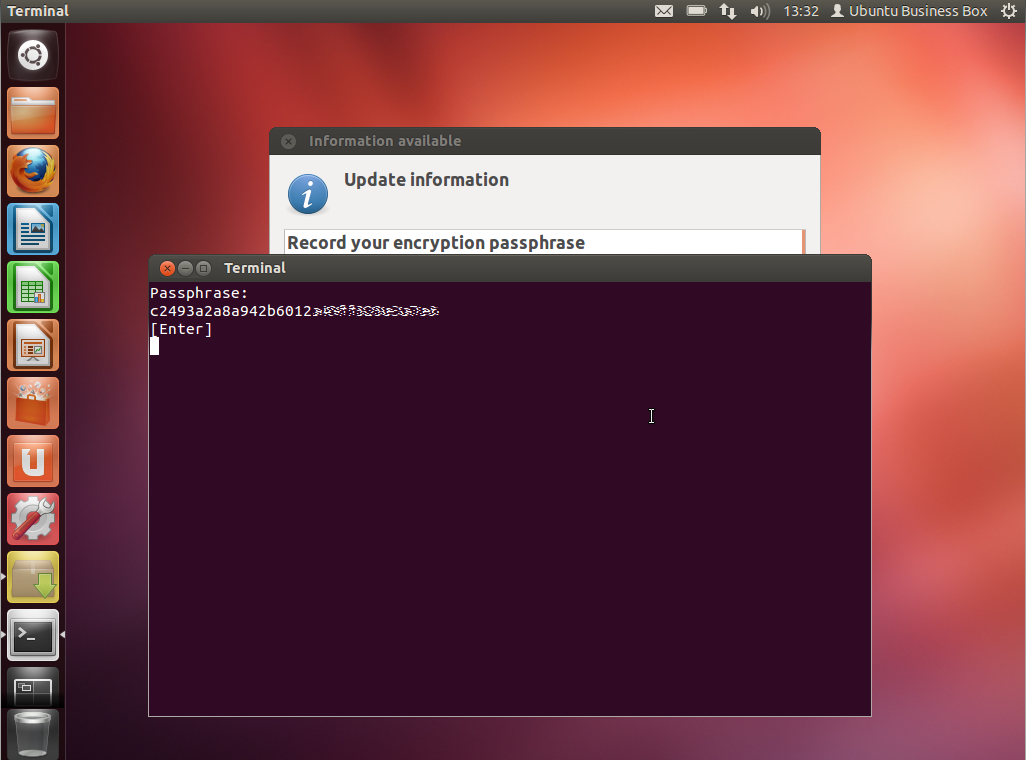
- Encrypting the home folder step is optional but provides an added level of security.
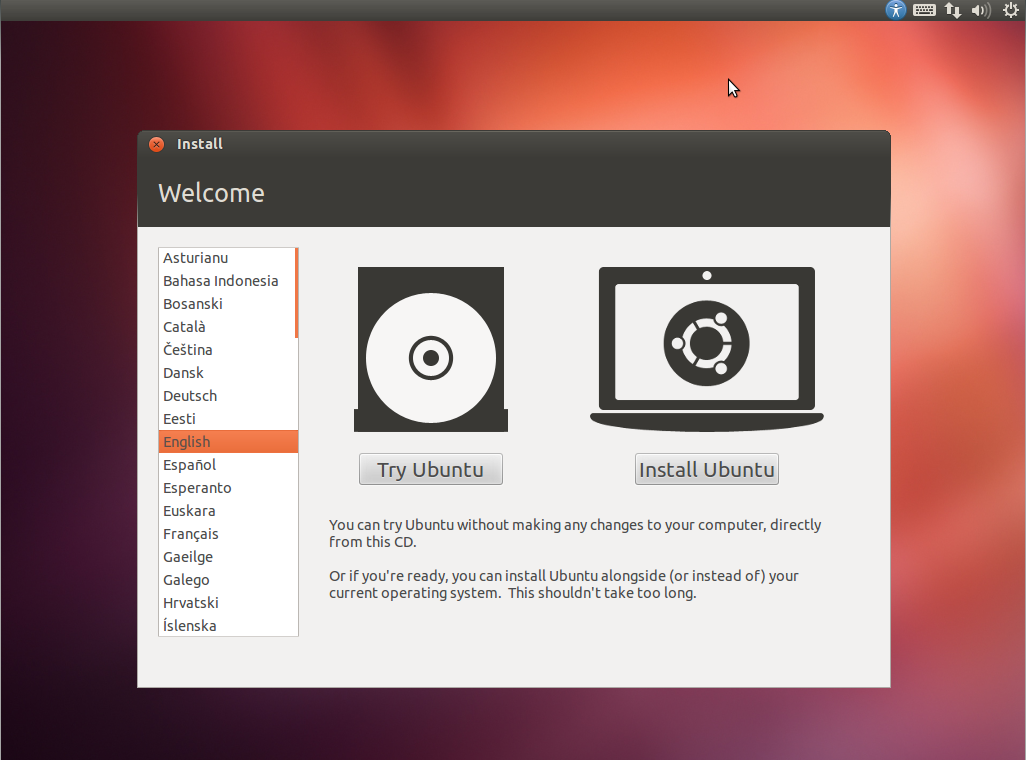

.png)

2. Set root password
- Ubuntu has very good reasons why they prefer we do not do this - but this needs to be done at some point or someone else will.
- Open a terminal window and enter :
sudo passwd root
- Enter your new root password.
3. Set Hostname (FQDN)
- Select a Fully Qualified Domain Name for your server.
- We will be using ubb01.mydomain.local as our FQDN example in the instructions.
- Add the name and IP to your /etc/hosts file as shown below and save the file:
sudo gedit /etc/hosts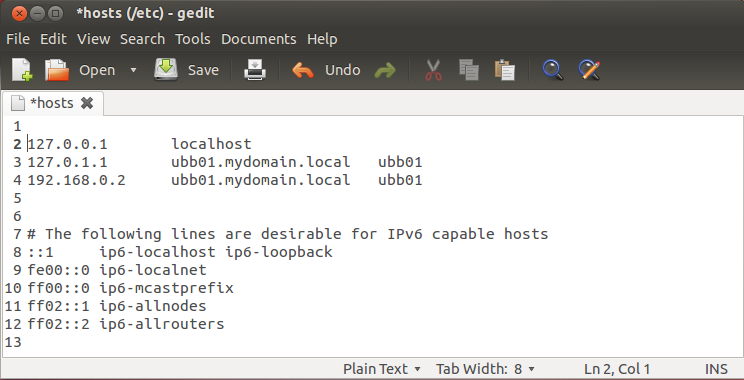
- Then change the hostname file by opening a terminal window and entering:
sudo su
echo "ubb01.mydomain.local" > /etc/hostname
service hostname restart
exit4. Configure Network Interfaces
- Ubuntu has very good reasons why it prefer we do not do this - but this needs to be done at some point or someone else will.
- Open a Terminal Window and enter the following :
sudo gedit /etc/network/interfaces
- Replace the content of the file with the following and save :
# The loopback network interface
auto lo
iface lo inet loopback

# The primary network interface
auto eth0
iface eth0 inet static
	address 192.168.0.2
	netmask 255.255.255.0
	network 192.168.0.0
	broadcast 192.168.0.255
	gateway 192.168.0.1
	dns-nameservers 192.168.0.1, 8.8.8.8

# IPTable rules
post-up iptables-restore < /etc/iptables.up.rules

# The secondary network interface internal
auto eth1
iface eth1 inet static
	address 192.168.1.2
	netmask 255.255.255.0
	network 192.168.1.0
	broadcast 192.168.1.255
- Disable IPv6 or add a static IPv6 to the above if your network supports it.
- Open a Terminal Window and enter the following :
sudo su
echo "net.ipv6.conf.all.disable_ipv6=1" >> /etc/sysctl.conf
echo "net.ipv6.conf.default.disable_ipv6=1" >> /etc/sysctl.conf
echo "net.ipv6.conf.lo.disable_ipv6=1" >> /etc/sysctl.conf
exit- Remove Network Manager
- Open a Terminal Window and enter the following :
sudo apt-get remove network-manager5. Edit the DNS configuration - Dnsmasq
- Install Dnsmasq. Open a terminal and enter:
sudo apt-get install dnsmasq- Edit the Dnsmasq configuration file by opening a terminal window and entering :
sudo gedit /etc/dnsmasq.conf- Replace the content of the file with the following and save :
# DNS Settings
server=/localnet/192.168.0.2
server=/#/192.168.0.1
server=/#/8.8.8.8
server=/#/8.8.4.4

# Domain Name
domain=mydomain.local

# Server DNS settings... this is required as the server itself will
# not be obtaining it's IP address via DHCP and therefore would
# not be automatically added to the DNS records for forward/reverse
# DNS queries as required by Kerberos

ptr-record=2.0.168.192.in-addr.arpa.,"ubb01.mydomain.local"
address=/ubb01.mydomain.local/192.168.0.2
- NOTE: The setup requires that you have your internet router with a fixed IP address of 192.168.0.1 connected to your LAN Adaptor #1 (eth0) port with a DNS nameserver running on the router providing internet access.
- NOTE: Your outward facing connection is LAN Adaptor #1 (eth0) with IP 192.168.0.2
- NOTE: Your inward facing connection is LAN Adaptor #2 (eth1) with IP 192.168.1.2
6. Reboot and check internet connectivity
- Reboot and after reboot make sure you are connected to the internet.
7. Add Ubuntu Partner Software Repositories and update software
- Make sure that the Ubuntu Partner Repository is active in your /etc/apt/sources.list file and uncomment if needed or add them manually below.
- Open a terminal window and enter :
sudo su
echo "deb http://archive.canonical.com/ubuntu precise partner" >> /etc/apt/sources.list
echo "deb-src http://archive.canonical.com/ubuntu precise partner" >> /etc/apt/sources.list
exit- Update your software sources and software.
sudo apt-get update && sudo apt-get -y dist-upgrade
- If there were any kernel upgrades reboot your system to complete the installation process before continuing.
8. Install support software
We need to install a bit of supporting software and other essentials. Here goes:
- Install Linux Server Kernel headers if you are working with the Ubuntu Desktop edition.
- Open a terminal window and enter :
sudo apt-get install linux-headers-server linux-image-server linux-server
- Install VIM-NOX to fix VI in Ubuntu - this is optional for command line nerds.
sudo apt-get install vim-nox
- Install OpenSSH Serve and openSSL.
sudo apt-get install openssh-server openssl
- Sync System Clock to internet time server
sudo apt-get install ntp ntpdate- WebMin PERL and Python essentials
sudo apt-get install perl libnet-ssleay-perl libauthen-pam-perl libpam-runtime libio-pty-perl apt-show-versions python - Security
sudo apt-get install rkhunter chkrootkit9. Install and configure transparent proxy cache with reporting - Squid | Sarg

- Install Squid.
- Open a Terminal Window and enter the following :
sudo apt-get install -y squid3 ccze sarg calamaris
- Create the cache folder.
- Open a Terminal Window and enter the following :
sudo mkdir /home/cache
sudo chmod 777 /home/cache
sudo chown proxy:proxy /home/cache- Backup the Squid configuration file.
- Open a Terminal Window and enter the following :
sudo mv /etc/squid3/squid.conf /etc/squid3/squid.conf.origin
sudo chmod a-w /etc/squid3/squid.conf.origin- Edit the Squid configuration file by opening a terminal window and entering :
sudo gedit /etc/squid3/squid.conf- Replace the content of the file with the following, adapt according to your network and acl options and save :
#
# NCSA - ncsa_auth : auth_param section
# uncomment the line below to enable - require username and passwrd authentication
#auth_param basic program /usr/lib/squid3/ncsa_auth /etc/squid3/squid_passwd
#
# ACCESS CONTROLS OPTIONS
# ====================
#
acl QUERY urlpath_regex -i cgi-bin ? .php$ .asp$ .shtml$ .cfm$ .cfml$ .phtml$ .php3$ localhost
acl all src
acl localnet src 192.168.1.0/24 # Your internal network here
acl localhost src 127.0.0.1/32
acl safeports port 21 70 80 210 280 443 488 563 591 631 777 901 81 3128 1025-65535
acl sslports port 443 563 81 2087 10000
acl manager proto cache_object
acl purge method PURGE
acl connect method CONNECT
acl ym dstdomain .messenger.yahoo.com .psq.yahoo.com
acl ym dstdomain .us.il.yimg.com .msg.yahoo.com .pager.yahoo.com
acl ym dstdomain .rareedge.com .ytunnelpro.com .chat.yahoo.com
acl ym dstdomain .voice.yahoo.com
acl social dstdomain .facebook.com .twitter.com .skype.com
acl ymregex url_regex yupdater.yim ymsgr myspaceim

# NCSA - uncomment the following two lines to enable username and password authentication
#acl ncsa_users proxy_auth REQUIRED
#http_access allow ncsa_users

# HTTP Access
http_access deny ym
http_access deny ymregex
http_access deny social
http_access allow manager localhost
http_access deny manager
http_access allow purge localhost
http_access deny purge
http_access deny !safeports
http_access deny CONNECT !sslports
http_access allow localhost
http_access allow localnet
http_access deny all
#
# NETWORK OPTIONS
# —————
#
# NCSA - remove the word 'transparent' from the line below to enable username and password authentication
http_port 3128 transparent
#
# OPTIONS WHICH AFFECT THE CACHE SIZE
# ==============================
#
cache_mem 8 MB
maximum_object_size_in_memory 32 KB
memory_replacement_policy heap GDSF
cache_replacement_policy heap LFUDA
cache_dir aufs /home/cache 10000 14 256
maximum_object_size 128000 KB
cache_swap_low 95
cache_swap_high 99
#
# LOGFILE PATHNAMES AND CACHE DIRECTORIES
# ==================================
#
access_log /var/log/squid3/access.log
cache_log /cache/cache.log
#cache_log /dev/null
cache_store_log none
logfile_rotate 5
log_icp_queries off
#
# OPTIONS FOR TUNING THE CACHE
# ========================
#
cache deny QUERY
refresh_pattern ^ftp: 1440 20% 10080 reload-into-ims
refresh_pattern ^gopher: 1440 0% 1440
refresh_pattern -i .(gif|png|jp?g|ico|bmp|tiff?)$ 10080 95% 43200 override-expire override-lastmod reload-into-ims ignore-no-cache ignore-private
refresh_pattern -i .(rpm|cab|deb|exe|msi|msu|zip|tar|xz|bz|bz2|lzma|gz|tgz|rar|bin|7z|doc?|xls?|ppt?|pdf|nth|psd|sis)$ 10080 90% 43200 override-expire override-lastmod reload-into-ims ignore-no-cache ignore-private
refresh_pattern -i .(avi|iso|wav|mid|mp?|mpeg|mov|3gp|wm?|swf|flv|x-flv|axd)$ 43200 95% 432000 override-expire override-lastmod reload-into-ims ignore-no-cache ignore-private
refresh_pattern -i .(html|htm|css|js)$ 1440 75% 40320
refresh_pattern -i .index.(html|htm)$ 0 75% 10080
refresh_pattern -i (/cgi-bin/|?) 0 0% 0
refresh_pattern . 1440 90% 10080
#
quick_abort_min 0 KB
quick_abort_max 0 KB
quick_abort_pct 100
store_avg_object_size 13 KB
#
# HTTP OPTIONS
# ===========
vary_ignore_expire on
#
# ANONIMITY OPTIONS
# ===============
#
request_header_access From deny all
request_header_access Server deny all
request_header_access Link deny all
request_header_access Via deny all
request_header_access X-Forwarded-For deny all
#
# TIMEOUTS
# =======
#
forward_timeout 240 second
connect_timeout 30 second
peer_connect_timeout 5 second
read_timeout 600 second
request_timeout 60 second
shutdown_lifetime 10 second
#
# ADMINISTRATIVE PARAMETERS
# =====================
#
cache_mgr ninja
cache_effective_user proxy
cache_effective_group proxy
httpd_suppress_version_string on
visible_hostname ubb01.mydomain.local
#
ftp_list_width 32
ftp_passive on
ftp_sanitycheck on
#
# DNS OPTIONS
# ==========
#
dns_timeout 10 seconds
dns_nameservers 192.168.0.1 8.8.8.8 8.8.4.4 # DNS Server
#
# MISCELLANEOUS
# ===========
#
memory_pools off
client_db off
reload_into_ims on
coredump_dir /cache
pipeline_prefetch on
offline_mode off
#
#Marking ZPH
#==========
zph_mode tos
zph_local 0x04
zph_parent 0
zph_option 136
### END CONFIGURATION ###- Create SWAP directory for Squid.
- Open a Terminal Window and enter the following :
squid3 -z- Configure IP Forwarding.
- Open a Terminal Window and enter the following :
sudo su
echo "net.ipv4.ip_forward=1" >> /etc/sysctl.conf
echo "net.ipv6.conf.all.forwarding=1" >> /etc/sysctl.conf
exit- Setup IPtables rules.
- Open a Terminal Window and enter the following :
sudo gedit /etc/iptables.up.rules- Add the following to the end of the file and save.
*nat
-A PREROUTING -i eth1 -p tcp -m tcp --dport 80 -j DNAT --to-destination 192.168.1.2:3128
-A PREROUTING -i eth1 -p tcp -m tcp --dport 80 -j REDIRECT --to-ports 3128
-A POSTROUTING -s 192.168.1.0/24 -o eth0 -j MASQUERADE
COMMIT- Setup NAT routing at startup.
- Open a editor and add the following :
sudo gedit /etc/rc.local
- Add the following to the /etc/rc.local file BEFORE the exit line
iptables -t nat -A POSTROUTING -s 192.168.1.0/24 -o eth0 -j MASQUERADE
- Fix Sarg log file location issue.
- Open a Terminal Window and enter the following or change the link in Webmin module config :
sudo ln -s /var/log/squid3 /var/log/squid- Optional : Username and Password Access Control ( *optional steps from this great Squid guide)
- *You can configure squid to prompt users for a username and password using ncsa_auth that reads any NCSA-compliant encrypted password file. You can use the htpasswd program that comes installed with Apache to create your passwords.
sudo touch /etc/squid3/squid_passwd
sudo chmod o+r /etc/squid3/squid_passwd- *Then uncomment the lines in the squid.conf file above to enable NCSA username and password authentication. (see comments in squid.conf file below. Note there are several options to enable.)
- *To add new users to squid use the htpasswd command (change administrator below for the username) or use Webmin to add new proxy users:
sudo htpasswd /etc/squid3/squid_passwd administrator- *NOTE: You cannot use the NCSA username and password authentication in combination with a transparent proxy. So if you do select this option you will need to manualy add 192.168.1.2 (the IP of your internal network adaptor eth1) port 3128 as the http proxy to each client machine on the network. This is why this option is disabled by default in this setup.
- Restart Squid and Networking.
- Open a Terminal Window and enter the following :
sudo service squid3 stop
sudo service squid3 start
sudo service networking restart- Optional : Install SquidGuard Blacklist Web Filter Plugin for Squid with this excellent guide by nixCraft
- Optional : Install DansGuardian Dynamic Web Content Filter Plugin for Squid. "It filters the actual content of pages based on many methods including phrase matching, PICS filtering and URL filtering. It does not purely filter based on a banned list of sites like lesser totally commercial filters". To install open a terminal window and enter:
sudo apt-get install dansguardian10. Install and configure DHCP Server - ISC DHCP
- Install a DHCP server to act on the internal network and assign IP, cache and routing information dynamically to users on the network.
- You could assign static IP addresses on the network as well but then you would need to manually configure the proxy and gateway information on each computer or network device.
- Open a Terminal Window and enter the following :
sudo apt-get install isc-dhcp-server- Then we need to edit the DHCP configuration settings.
sudo gedit /etc/dhcp/dhcpd.conf- Add the following to the end of the file and save.
- Make sure to change your domain name details as shown in blue below.
- Also add other DNS nameservers for your local service provider if needed.
# UBB DHCP settings

subnet 192.168.1.0 netmask 255.255.255.0 {
  range 192.168.1.20 192.168.1.250;
  option domain-name "ubb01.mydomain.local";
  option routers 192.168.1.2;
  option domain-name-servers 192.168.1.2, 8.8.8.8, 196.43.1.11;
  option netbios-name-servers 192.168.1.2;
  option subnet-mask 255.255.255.0;
  option broadcast-address 192.168.1.255;
  default-lease-time 600;
  max-lease-time 7200;
}- Select network adaptor for DHCP server.
- Open a Terminal Window and enter the following :
sudo gedit /etc/default/isc-dhcp-server- Change the value of INTERFACES to INTERFACES="eth1" as shown below and save.
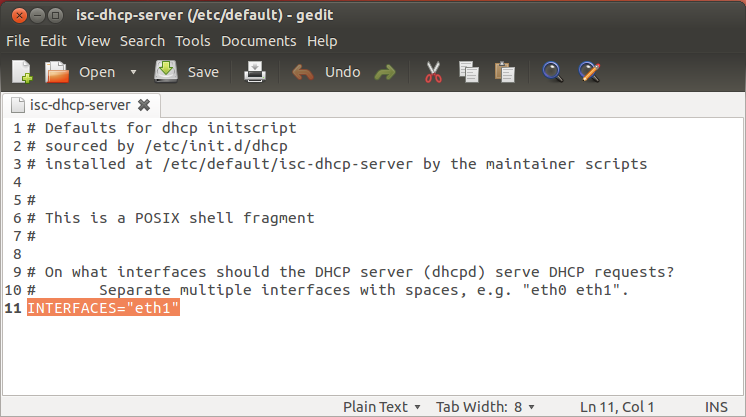
-
Fix wrong/missing DHCP links in Webmin (after step 12):
- DHCP Server config file : /etc/dhcp/dhcpd.conf
- DHCP Server executable : /usr/sbin/dhcpd
- Command to start/apply/stop DHCP server : /etc/init.d/isc-dhcp-server (start/stop/restart)
- Path to DHCP server PID file : /var/run/dhcpd.pid
- DHCP server lease file : /var/lib/dhcp/dhcpd.leases
- Restart DHCP server.
- Open a Terminal Window and enter the following :
sudo service isc-dhcp-server restart11. Install and configure Samba

- Install Samba by opening a terminal window and entering:
sudo apt-get install samba samba-common libpam-smbpass winbind smbclient libcups2
- We will be using Samba as a standalone server and set-up as per the brilliant instructions from HowtoForge
- Next we need to edit the /etc/samba/smb.conf file to uncomment security = user. You could use sed and these three lines to do the search and replace via the command line. Double check as the spaces in the script could change in future config files.
sudo sed 's/#   security = user/security = user/g' /etc/samba/smb.conf > /tmp/.smb.conf
sudo mv /etc/samba/smb.conf /etc/samba/smb.conf.backup
sudo mv /tmp/.smb.conf /etc/samba/smb.conf- Create directories for sharing
sudo mkdir -p /home/shares/allusers
sudo chown -R root:users /home/shares/allusers/
sudo chmod -R ug+rwx,o+rx-w /home/shares/allusers/- Then edit smb.conf file.
sudo gedit /etc/samba/smb.conf- Add the following and save
[allusers]
  comment = All Users
  path = /home/shares/allusers
  valid users = @users
  force group = users
  create mask = 0660
  directory mask = 0771
  writable = yes

[homes]
   comment = Home Directories
   browseable = no
   valid users = %S
   writable = yes
   create mask = 0700
directory mask = 0700- Restart Samba server
sudo service smbd restart- Add your admin user to samba users to access allusers folder. We will add administrator to the Samba share group "users" for this example.
sudo usermod -aG users administrator- Finally set a Samba password for administrator
sudo smbpasswd -a administrator- You should be able to access the allusers folder and login from a client machine with your administrator username and password at his point by using
smb://ubb01/allusers/If you have completed step 13. and 14. each user will be able to access their own private home folder using
smb://ubb01/<username>12. Install Webmin
- Download and install the support software and latest version of Webmin directly from the website with the commands below .
- After installation you will be able to assess webmin via any browser on the network via https://192.168.0.2:10000 or https://ubb01.mydomain.local:10000
- Open a Terminal Window and enter the following :
sudo apt-get install webalizer smartmontools vlogger awstats geoip-database- Remove awstats cron jobs
sudo rm /etc/cron.d/awstats- Finally download and install Webmin
cd /tmp
sudo wget http://www.webmin.com/download/deb/webmin-current.deb
sudo dpkg --install webmin-current.deb
sudo rm webmin-current.deb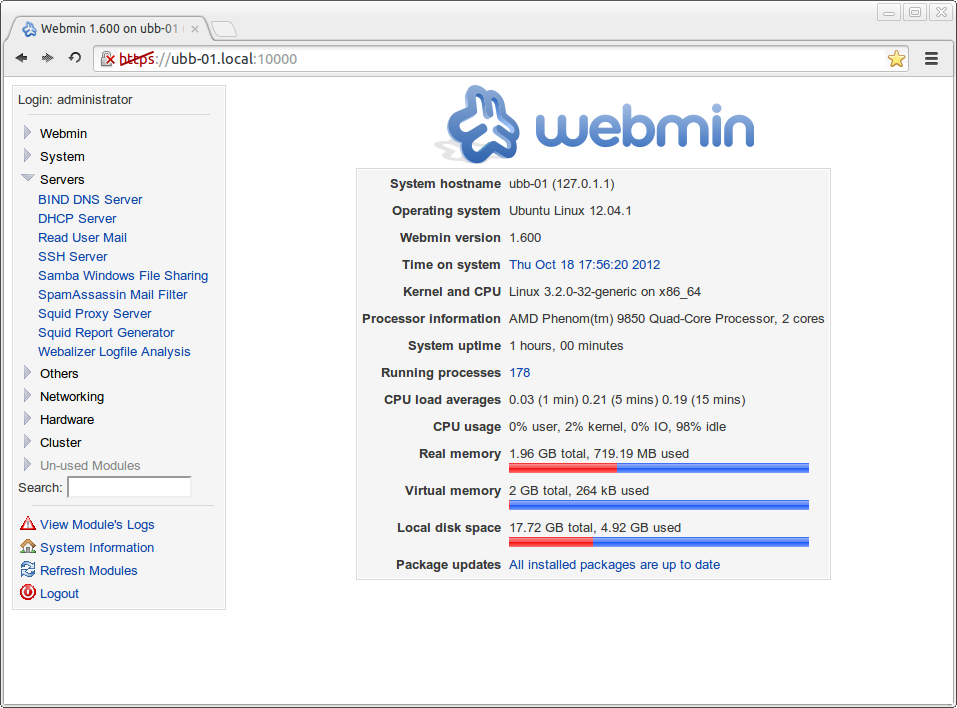
13. Synchronise Samba users and System users (optional)
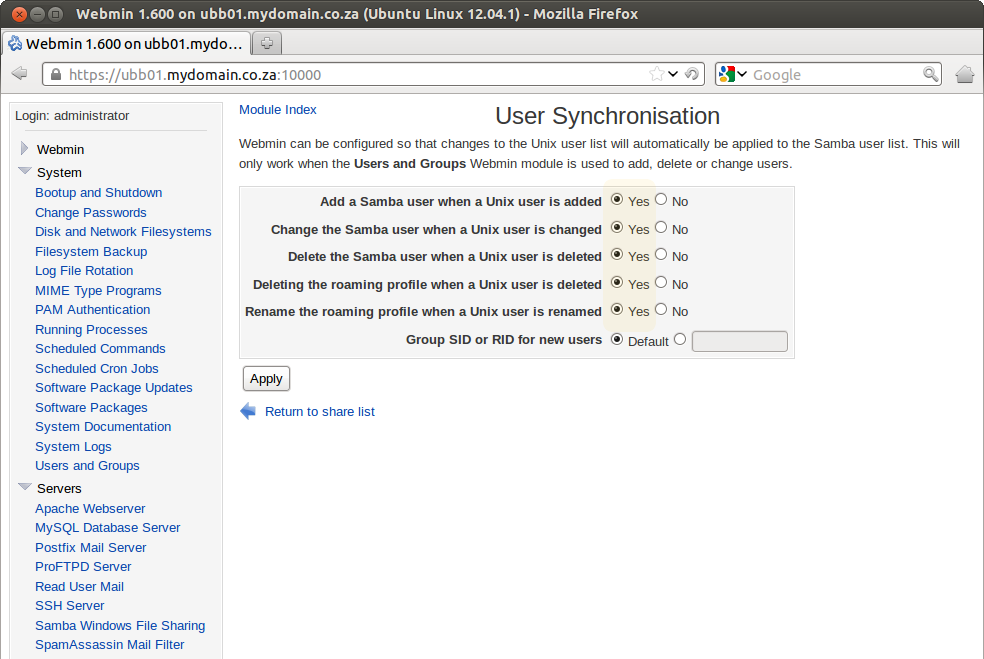
- To synchronise the Samba and System users we can use Webmin to manage this so every time you add a new system user a new samba user is created automatically.
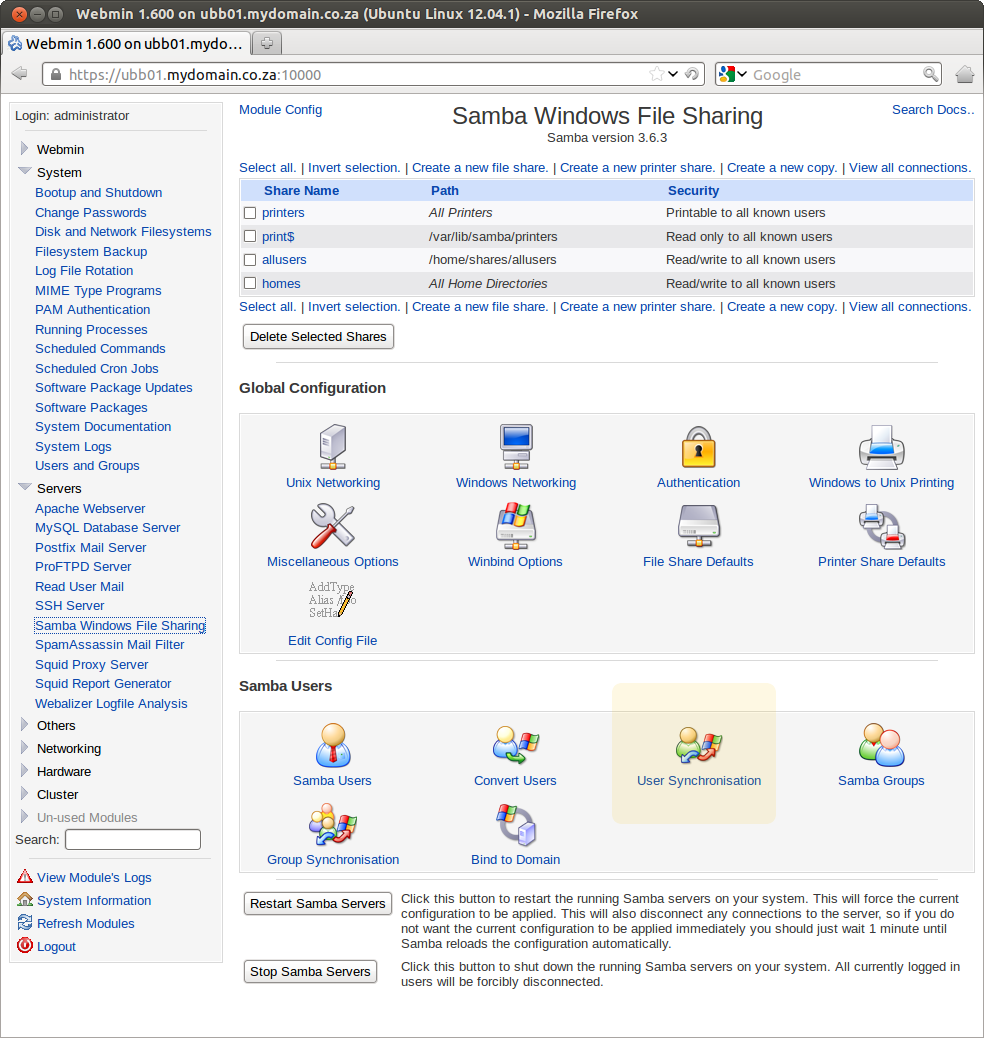
- Open the Webmin and navigate to Servers > Samba Windows File Sharing
- Click on User Syncronisation
- Set everything to Yes and click Apply.
- You will need to restart the Samba server on the main Webmin Samba page above before new settings will take effect.
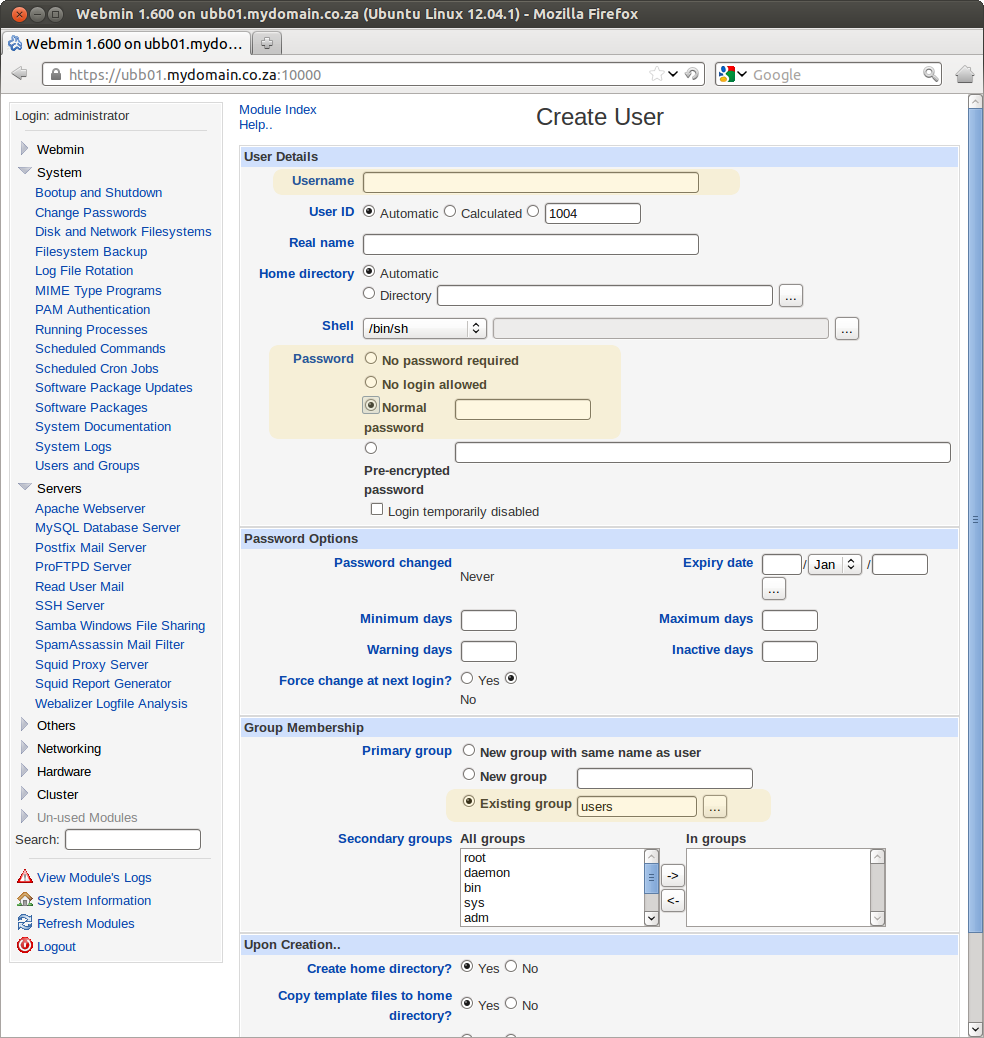
14. Adding new system users.
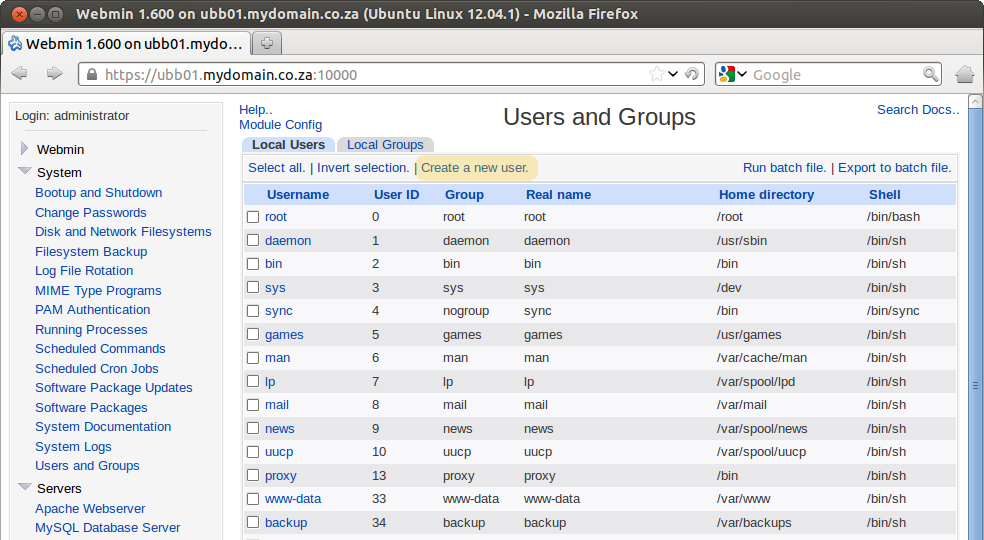
- Open the Webmin and navigate to System > Users and Groups
- Click on Create New User
- New users on the system will be able to access their own private home folders on the server as well as the allusers shared folder via samba if you followed step 13. above.
- You need to enter new Username,
- Set the password to "Normal Password" and enter a user password, also make sure that the user belongs to the "users" group or the user will not be able to login to any Samba share.